Since we are now in full fledged winter mode, I decided to use a long-sleeve black top, and paired with with some gray linen I picked up at the LA fabric district.


I added some ties to get a more fitted look around the waist.

I know I've posted some tutorials for these dresses before, but I think this one is a little more comprehensive.
If you don't know how to sew, or know the basics but are interested in learning more, Merrick and I have created The Modern Girl's Guide to Sewing, online sewing courses that teach you everything you need to know about clothing construction. You can take our Beginner Course or our Intermediate Course, and learn how to follow tutorials like this one! Make sure to check out moderngirlsewing.com!
Get the tutorial below....
Materials needed:
- shirt
- about 1 1/2 yards of fabric
- coordinating thread (elastic thread / wooly thread optional)
* I taught 2 different classes, so I had enough material to make 2 different dresses. I didn't have time to make the second one in class, so I made it at home, and took pictures along the way. I used a stretchy knit for the skirt portion.
Adri also taught a fabulous class on re purposing shirts. She never ceases to amaze me at how talented she is with a sewing machine. She introduced me to this life changing thread:
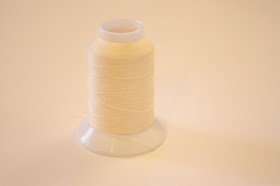
It's called wooly nylon thread, and you use it just like you would elastic thread (use it only in the bobbin). Its not quite as stretchy as elastic thread, but it lays flat, for a great finished look. It is used on pretty much all stretchy tops. The best part is it comes on a huge spool and will last forever.
(but now I am addicted to it.... so it might go faster than I think)
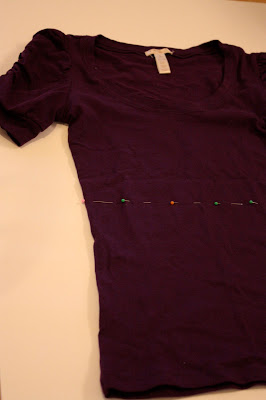
Step 1:
Try on shirt and mark where you would like the top of the waistband to hit. Measure 1/2” down from
that mark and cut across shirt. The added 1/2” will be for your seam allowance.
that mark and cut across shirt. The added 1/2” will be for your seam allowance.

Step 2:
Measure across the width of the shirt to get the measurement for your waistband. Add on 1” to this
measurement to allow for 1/2” seam allowance per side, and cut out 2 strips of fabric that are the
amount you calculated long, and 3” wide. Surge or zigzag stitch around all of the edges of both waistbands to keep from fraying.
measurement to allow for 1/2” seam allowance per side, and cut out 2 strips of fabric that are the
amount you calculated long, and 3” wide. Surge or zigzag stitch around all of the edges of both waistbands to keep from fraying.
*The finished waistband will be 2” wide. You can adjust this however you would like.

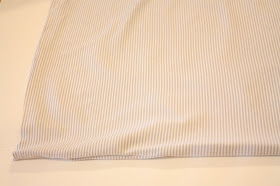
Step 3:
Now it is time to measure for the skirt portion of the dress. Double the width of your waistband to get
the width of the skirt. The wider the width of the skirt, the fuller it will be. So feel free to make it 2 1/2 times the width of the shirt if you would like a fuller skirt. Have the length of the skirt hit at least 5” below your knee (make sure you hold up the fabric where you want the top of the skirt to hit). This will give you plenty of fabric to work with when creating the hem of your skirt at the end. Cut 2 of these pieces (one for the front, one for the back). Surge or zigzag stitch along the top and sides of these 2 pieces to keep from fraying.
the width of the skirt. The wider the width of the skirt, the fuller it will be. So feel free to make it 2 1/2 times the width of the shirt if you would like a fuller skirt. Have the length of the skirt hit at least 5” below your knee (make sure you hold up the fabric where you want the top of the skirt to hit). This will give you plenty of fabric to work with when creating the hem of your skirt at the end. Cut 2 of these pieces (one for the front, one for the back). Surge or zigzag stitch along the top and sides of these 2 pieces to keep from fraying.
Step 4:
Take your 2 skirt pieces and place them right sides together. Sew up the side seams with a 1/2” seam
allowance. Set aside.
allowance. Set aside.
Step 5:
Place your 2 waistband pieces right sides together and sew up the side seams with a 1/2” seam allowance.

Step 6:
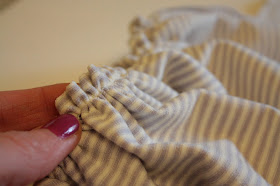
Sew 2 rows of basting stitches along the top of your skirt. Sew the first row 1/4” away from the edge,
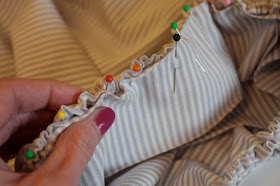
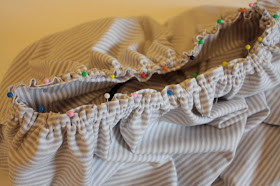
and the second row 1” away from the edge. Now, pull on one side of the thread to gather your fabric. Gather it so that it becomes smaller than the width of your waistband. With right sides together, place the top of the skirt on the bottom of the waistband so that the raw edges meet. Match up the side seams and pin. Now gently loosen the gathered skirt so that it becomes the same size as the circumference of your waistband and pin in place. Make sure that the gathers look even.
and the second row 1” away from the edge. Now, pull on one side of the thread to gather your fabric. Gather it so that it becomes smaller than the width of your waistband. With right sides together, place the top of the skirt on the bottom of the waistband so that the raw edges meet. Match up the side seams and pin. Now gently loosen the gathered skirt so that it becomes the same size as the circumference of your waistband and pin in place. Make sure that the gathers look even.

Step 7:
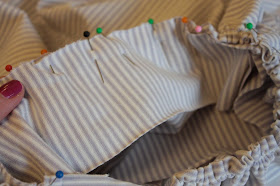
Sew the waistband and the skirt together with a 1/2” seam allowance, in the middle of your two basting stitches. Pay close attention as you sew so that the gathers are staying in place and that the sewing machine doesn’t flatten them out.

Step 8:
With the skirt portion of your dress still inside out, slip your shirt (facing right side out) down into the
waist of the skirt. Match up the side seams of the shirt with the side seams of the waistband and pin in
place.
waist of the skirt. Match up the side seams of the shirt with the side seams of the waistband and pin in
place.

Step 9:
Sew around the waistband with a 1/2” seam allowance. Flip the skirt right side out.
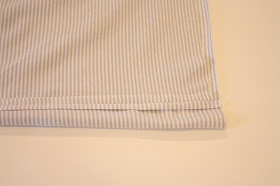
Step 10:
Almost done! Now try on your skirt and mark where you want the bottom of the skirt to hit. Add on 1”
to where you marked for your hem, and cut. To hem, surge or zigzag stitch along the bottom of the
skirt, iron 1” under, and sew 1” from the bottom. If you don't have a surger, you can also iron the
bottom under 1/4”, then under again 3/8” and sew in place.
to where you marked for your hem, and cut. To hem, surge or zigzag stitch along the bottom of the
skirt, iron 1” under, and sew 1” from the bottom. If you don't have a surger, you can also iron the
bottom under 1/4”, then under again 3/8” and sew in place.

hair flower sold here

Very cute. (I don't think I realized you were LDS. Maybe I did and forgot.)
ReplyDeletelove it. how funny- adri is my cousin, and yes- she is amazingly talented.
ReplyDeleteSo glad you posted this because I wasn't able to make it to the activity! I love the tie on the back of the winter dress! I am dying to try it! I am putting off all projects until I am done with school but this one is definitely at the top of the list!! love it!
ReplyDeleteThank you! This is fabulous! It fits my budget and looks adorable!
ReplyDeleteSuper adorable!!! I'm going to make this soon!!!
ReplyDelete~Madeline
p.s. Check out our Christmas giveaway:http://flameinthedarkness.com/fabulous-flower-bracelet-giveaway/
Thanks for the info - I'm excited to make one! I'd love to see pics of the second dress you made!
ReplyDeleteI love this! I gave you an award! Check it out!
ReplyDeletehttp://thecraftycopycat.blogspot.com/2010/12/apparently-im-stylin.html
I think I'm gonna put this tutorial to good use! I love tucking in my shirts and pulling up my skirts to my natural waist, but I've never actually made a dress out of it! I need to find a new skirt/shirt to sew together because I'm a bit attached to all my clothes, but I'll definitely be coming back!!! Thanks for the post!
ReplyDeleteLove, Jennie
PS I'm new to your blog! I found it yesterday and I fell in love, so I just wanted to drop a little comment to let you know I'm reading and that I think you're adorable!! :)
really great!
ReplyDeleteI love this dress and have purchased all of the supplies to try it but I'm wondering-if I use a courderoy for the skirt and waistband will I still be able to get it on over my head without a zipper?
ReplyDeleteThanks for posting the tutorial! Can't wait to try it.
Thanks for an awesome tutorial. I'm going to try this with a short sleeve and maybe a tank too!! I was wondering, on what part of the dress did you use the stretchy thread?
ReplyDeleteLove the bow and the pockets!
ReplyDeleteI'm not much of a sewer (NEVER attempted clothes!) but I bought all the stuff to try this. My skirt fabric is also linen, so I'm thinking I will want to add the tie to it. How did you work that in?
ReplyDeleteI've been reading your blog for awhile now, and just want to let you know that you're adorable! I love your t-shirt dresses! I have a t-shirt and some stretchy fabric to make one of these dresses, but I'm kinda nervous to try. I've never been able to sew well on stretchy fabrics. Did you use the elastic thread all throughout the sewing of the dress?
ReplyDeleteAnd I was wondering the same thing as susan, if I use corduroy will I be able to get it past my shoulders?
Thanks!
Summer isn't even here yet, and for some reason I have Fall on the brain. This is lovely :)
ReplyDeleteBeautiful! How did you add the tie? It's my favorite part.
ReplyDeleteThis is lovely. How did you do the pockets?
ReplyDeletei am going to make this in five, four, three, two one!
ReplyDeleteI just found your blog!! Love the dresses!!
ReplyDeleteI found your blog at 2 am today and have already made this dress. I couldn't wait to get started and it barely took an hour. I made it according to the instructions today, but am going to do another one with the sash. Thank you for the tutorial. Can't wait to try others!
ReplyDeleteI found your blog through Pinterest. I love your t-shirt dress tutorials. You're incredibly clever!
ReplyDeleteI wish you were on our Enrichment Committee! I love your blog!
ReplyDeleteLeanne, I'm going to attempt to make this dress scaled down for my 2 year old daughter. Would you mind telling me how to do the dress with the added sash? My email is little_a98(at)yahoo(dot)com. Thanks! P.S. congratulations on your new shop!
ReplyDeleteDo you mind me asking how you added the tie?
ReplyDeleteThanks for posting the tutorial! I'm going to adjust it a bit and make it a maternity dress :)
ReplyDeleteHi Leanne! I discovered your blog today and I am so happy about it!! Seriously, I can't wait to start making some of these dresses!!! I love this one, and was wondering how you added the tie to the back??
ReplyDeleteThanks!!
-Emma
I've had this on my mind since one of my cats accidentally tore a little hole in the stomach of a favorite t-shirt. I FINALLY bought fabric for the skirt and plan on doing this project in the next few days. Thanks for the instructions! I'm excited to have a new dress for less than $10. :)
ReplyDeleteI too was wondering how you added the sash. A couple strips of cloth or matching ribbon attached at the side seams of the waistband perhaps? Do tell.
ReplyDeleteI did a post on how to add ties here: http://elleapparel.blogspot.com/2011/05/shirt-dress-reader-questions.html
ReplyDeleteThanks for reading!
Beautiful! Thank you for the tutorial! -Marci @ Stone Cottage Adventures
ReplyDeleteI just made this dress (allowing for my 5-month bump) and it turned out fabulous, thank you so very much for posting such an easy-to-follow and thorough tutorial! The separate note about working with non-stretch fabrics came in particularly handy. Thanks again!
ReplyDeleteThanks for sharing the online training for preparing the dress,this method is very simple and money saving.
ReplyDeleteRoger
My First Bandage Big Cartel provides you with your own independent store to sell online. Over 250,000 clothing designers, “BUY” Cloth from our online store. Delivery will be made within 3-10 business days from the day of purchase. A signature is required on delivery, therefore we recommend a work address if this is more convenient for you.
ReplyDeleteBuy from here:>> http://myfirstbandage.bigcartel.com/
Really good job, love it. Thanks
ReplyDeletehttp://www.missesdressyonline.com/
I LOVE your shoes! Where did you get them?
ReplyDeleteThis is so wonderful and such a great tutorial...thanks for taking the time to share.
ReplyDeleteintegrated receivables management
Great Post, i really like it
ReplyDeletevetement femme enceinte
I am very much pleased with the contents you have mentioned. I wanted to thank you for this great article. I enjoyed every little bit part of it and I will be waiting for the new updates.
ReplyDeleteMade to Measure Dress Shirts
hey cute dress, I made it. only problem is that it wont fit over my boobs. any suggestions?
ReplyDelete